How to Clean an Ultrasound Probe

Cleaning is a mandatory first step in the high-level disinfection process of intracavity ultrasound transducers, such as transesophageal and endocavity probes. Healthcare workers may use 'pre-cleaning' and 'cleaning' interchangeably.
Properly cleaning the probe optimizes the disinfection process and the American Institute for Ultrasound in Medicine (AIUM) states that "adequate transducer preparation is mandatory."1 If you skip the cleaning step or perform it inadequately, you will compromise the entire disinfection or sterilization process.
What is ultrasound probe cleaning, and why is it important?
 The CDC defines cleaning as:
"Cleaning is the removal of foreign material (e.g., soil, and organic material) from objects and is normally accomplished using water with detergents or enzymatic products. Thorough cleaning is required before high-level disinfection and sterilization because inorganic and organic materials that remain on the surfaces of instruments interfere with the effectiveness of these processes."2
AIUM's recommendation for cleaning transducers emphasizes how crucial it is to pre-clean your probes prior to high-level disinfection. Cleaning and disinfection are required even if a probe cover or sheath is used:
"Meticulous cleaning of the instrument is the key to an initial reduction of the microbial/organic load by at least 99%. This cleaning is followed by a disinfecting procedure to ensure a high degree of protection from infectious disease transmission, even if a disposable barrier covers the instrument during use."1
One might ask why cleaning is necessary if you're going to high-level disinfect or sterilize the transducer.
Here's why cleaning is necessary:
Bioburden is "the degree of microbial contamination or microbial load; the number of microorganisms contaminating an object."3 Bioburden includes both microscopic debris and debris that is visible to the naked eye and refers to tissue, body fluids, bacteria, or any other biologic material present on, or in, an instrument or device after use on, or in, a patient. Varying degrees of bioburden will be present on an object after use on a patient; the accumulation of bioburden on used equipment is unavoidable. Once bioburden is present on a surface, biofilm formation is not far behind.4
Biofilms are communities of microorganisms (organic matter in the form of a serum, blood, pus, fecal material, or lubricant material and inorganic matter in the form of mineral material such as salt, iron, and calcium salt)5 that attach themselves to the surface of the ultrasound probe and develop a barrier, making them highly resistant to disinfection and removal. Organic material absorbs germicidal molecules and inactivates them.6
The biofilms will accumulate and harden on the probe. These biofilms can interfere with the antimicrobial activity of disinfectants in at least two ways:2
- Cleaning residual organic or inorganic matter left on the probe increases the margin of safety and shortens the exposure time required to kill the entire microbial load.5
- Any remaining transducer gel can also act as a barrier to the high-level disinfectant and diminish the efficacy of reusable disinfectant.5
Institutional risks due to improper or failed processes and failure to adhere to reprocessing guidelines can have serious outcomes.7
- Placing patients at risk for contamination
- Causing potential outbreaks
- Potential loss of Joint Commission accreditation
- Potential loss of Centers for Medicare and Medicaid Services (CMS) deeming status
- Bad publicity, lost business, a damaged reputation
- Litigation
- Increased cost of purchasing a new probe
CIVCO is a global organization that is committed to making image-guided procedures safer through the design, manufacturing, and marketing of medical ultrasound products. We enable clinicians to provide safer outcomes by developing patient-focused products, delivering outstanding service, and superior quality. Our products are trusted by physicians and clinicians in radiology, regional anesthesia, vascular access, men's and women's health, cardiology, infection control, sterile processing, and surgery.
What is the proper cleaning and reprocessing procedure for each probe and exam type?
Education and collaboration are KEY! This is where collaboration with your Infection Control/Prevention department is essential and knowing your MIFU (Manufacturer's Instruction for Use) for recommended cleaners and processing per probe. CMS requires an on-site assessment survey to be completed for Infection Control compliance.8
The survey includes recommendations of:
- Yearly department personnel training by Infection Prevention (IP)
- New hire training by IP
- Transducers are marked by Spaulding categories
- Quarterly checks by IP
- Posted guidelines from AAMI, AIUM, CDC, TJC
When it comes to cleaning probes, CMS inspectors will look for the following:8
- Are you following the ultrasound manufacturer's instructions or evidence-based guidelines for cleaning?
- Are you visually inspecting the probe prior to high-level disinfection for residual soil and re-cleaning as needed before high-level disinfection?
Consult with your department administrator, ultrasound MIFU, and Infection Control department for your facility policy and process.
To determine the type of reprocessing needed for your ultrasound probe, you must categorize the probe based on the Spaulding Classification.9
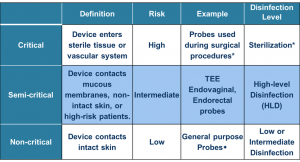
Intracavity probes (transesophageal, transvaginal, transrectal) are classified as "semi-critical" and require high-level disinfection after cleaning the probe.
How do I properly clean intracavity probes?
AIUM's recommendation for cleaning internal probes:
"Transducers should be cleaned after each examination with soap and water or quaternary ammonium (a low-level disinfectant) sprays or wipes. The transducers must be disconnected from the ultrasound scanner for anything more than wiping or spray cleaning. After removal of the transducer cover (when applicable), use running water to remove any residual gel or debris from the transducer. Use a damp gauze pad or other soft cloth and a small amount of mild non-abrasive liquid soap (household dishwashing liquid is ideal) to thoroughly cleanse the transducer. Consider the use of a small brush, especially for crevices and areas of angulation, depending on the design of the particular transducer. Rinse the transducer thoroughly with running water, and then dry the transducer with a soft cloth or paper towel."1
Let's break it down into steps:
- Disassemble (if there is a needle guide)
- Remove the probe cover
- Clean probe immediately by using a low lint cloth and pre-cleaning solution listed in the ultrasound manufacturers' IFU.
- Rinse with tap water
- Dry with cloth/towel or air dry
- The drying step is imperative. As with debris and gel, residual water can mitigate the disinfection process. Whereas the former can act as barriers, water can dilute the disinfectant. Always perform MRC (Minimum Required Concentration) testing of HLD solution before reprocessing to ensure efficacy.
- Visually inspect entire transducer to make sure that it's clean, no visible residual biofilm or bioburden remains, and there are no defects in the transducer housing or cables, which could potentially cause harm to the patient.
Does a probe cover or condom replace the need for cleaning? No. The FDA states:
"Please note that the use of sheathes does not change the type of processing that is recommended for the transducer…Sheathes can fail during the use and the level of resulting contamination may not be easily visible."10
Cleaning is required, whether reprocessing the ultrasound transducer via automated or manual high-level disinfection. You should begin the disinfection process with a pre-cleaned probe.
Steps to maintain compliance with ultrasound probe infection control standards include:

- Procedure
- Per the AIUM, "the use of a high-quality single-use transducer cover during each examination is required to properly protect patients from infection."1
- Transportation
- Safely transport the ultrasound probe after the procedure. The Joint Commission recommends to "Remove the device from the room in a covered container…"10
- Pre-Clean/Clean
- Remove visible bioburden from the transducer
- High-Level Disinfection
- Visit How to High-Level Disinfect Your Ultrasound Probes to learn more
- Storage
- The Joint Commission recommends, "Store the device in a manner that will protect from damage or contamination…hanging vertically in a cabinet and storing in a clean environment."10
Always be sure to refer to your facility's infection control policies and protocols, as well as the probe manufacturer's Instructions for Use and Labels for Use. Since disinfection practices are constantly evolving, it's necessary to stay current.
Maintaining proper cleaning and disinfection of your ultrasound probes is a crucially important step in staving off infection. However, as outlined above, it's also a process that can be quite time-consuming. CIVCO knows just how important your time is, which is why we developed Envision, a new way to perform ultrasound that's fast, safe, and easy. Learn more here.
References
- AIUM Guidelines for Cleaning and Preparing External- and Internal-Use Ultrasound Transducers Between Patients & Safe Handling and Use of Ultrasound Coupling Gel
- CDC Guideline for Disinfection and Sterilization in Healthcare Facilities, 2008.
https://www.cdc.gov/infectioncontrol/pdf/guidelines/disinfection-guidelines-H.pdf - "Bioburden." Farlex Partner Medical Dictionary; 2012 [accessed 2017 Jan 09]. [1 p]. Available: http://medicaldictionary.thefreedictionary.com/bioburden.
- James Davis, Retained Bioburden On Surgical Instruments After Reprocessing: Are We Just Scraping the Surface? http://patientsafety.pa.gov/ADVISORIES/documents/201706_71.pdf
- Tammy Tunstall, Journal of Diagnostic Medical Sonography, Infection Control in the Sonography Department. https://journals.sagepub.com/doi/pdf/10.1177/8756479310374362
- https://www.jointcommission.org/on_infection_prevention_control/growing_patient_safety_concern_improperly_sterilized_hld_equipment/
- CMS. Sample CMS Survey for ASC, Infection Control Surveyor Worksheet, Exhibit 351. https://www.cms.gov/Regulations-and-Guidance/Guidance/Manuals/downloads/som107_exhibit_351.pdf
- https://sdapic.org/wp-content/uploads/2015/12/TJC-HLD-BoosterPak-Dec-2015.pdf
- http://www.fda.gov/MedicalDevices/DeviceRegulationandGuidance/GuidanceDocuments/ucm089001.htm
- The Joint Commission, Infection Prevention and Control (IC) (Ambulatory Health Care/Ambulatory Health Care), 2017


